Machu Picchu photography 2026: Pro Tips
Master Machu Picchu photography 2026 with our expert guide to capturing the ancient Inca citadel under dynamic Andean light.
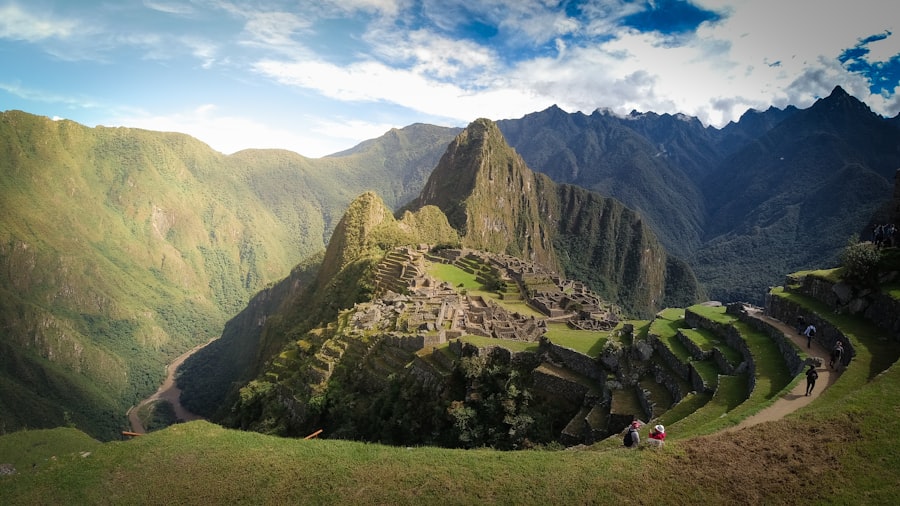
Planning your dream trip and mastering your Machu Picchu photography 2026 skills is the ultimate way to ensure your memories of this ancient wonder last a lifetime.
I still remember my first trip to the Andes. I stood on the guardhouse terrace, the morning sun finally breaking through the heavy mist, and I clicked my shutter. When I looked at the LCD screen, my heart sank. The sky was a glaring, washed-out white, and the ancient stone terraces were shrouded in dark, muddy shadows. I had fallen into the classic trap of high-contrast mountain shooting. But do not worry! I spent the next three days figuring out exactly how to beat the challenging Andean light, and today, I am going to coach you so your photos look absolutely breathtaking from your very first shot.
Understanding the Light and Rules in 2026
Before we pack our bags, we need to address the reality of shooting at this world heritage site today. The local park authorities have strict rules to preserve the ruins. Tripods, monopods, and large professional selfie sticks are strictly banned. This means you will be shooting entirely handheld.
The secret is learning to stabilize your body to act as a human tripod. Tuck your elbows tightly against your ribs, take a deep breath, exhale halfway, and hold still as you press the shutter button. Additionally, the park routes are strictly one-way. Once you pass a scenic spot, you cannot turn back. This means you must get your Machu Picchu photography 2026 shots right the first time you walk by them.
The Essential Gear Checklist for 2026
Since you cannot bring heavy support gear, choosing the right camera body and lenses is absolutely critical. You want a lightweight setup that does not sacrifice image quality.
Must-Have Gear for Your Camera Bag
- A Versatile Zoom Lens: A 24-70mm or 24-105mm lens is your best friend here. It allows you to shoot wide landscapes and zoom in on distant stone details without swapping lenses in the dusty mountain air.
- A Circular Polarizer Filter (CPL): This is non-negotiable. A CPL cuts through atmospheric haze, makes the blue sky pop, and saturates the deep green grass of the terraces.
- Microfiber Cloths: The mountain weather changes in seconds. You will constantly be wiping mist and condensation off your lens.
- Spare Batteries: Cold mountain mornings drain battery life incredibly fast. Keep your spares in an inside pocket close to your body heat.
The Golden Rule of Andean Light: Always protect your highlights! It is incredibly easy to overexpose the bright clouds rolling over the peaks. It is much easier to recover dark shadows in post-processing than it is to fix a blown-out, pure white sky.
Mastering Your Camera Settings
Let us demystify the technical jargon so you can control your camera with confidence. First, let's look at your file format. You should always shoot in RAW rather than JPEG. A JPEG file discards massive amounts of image data to save space. A RAW file saves every bit of light information your sensor captures, giving you the power to rescue shadows and highlights later in software like Adobe Lightroom.
Next is ISO, which measures your camera sensor's sensitivity to light. A low ISO like 100 or 200 gives you the cleanest, sharpest images. As it gets darker, you raise the ISO, but high ISOs introduce digital noise (graininess) into your photos. Now try this: keep your ISO as low as possible during the bright morning, but do not be afraid to bump it up to 800 if the mountain fog rolls in and threatens to blur your handheld shots.
Recommended Settings Cheat Sheet
- Shooting Mode: Aperture Priority (A or Av on your camera dial). This lets you control the depth of field while the camera manages the shutter speed.
- Aperture: f/8 to f/11 for sharp, sweeping landscapes where everything from the foreground llama to the distant Huayna Picchu mountain is in sharp focus. Use f/2.8 or f/4 if you want to create a beautiful, blurry background (known as Bokeh) behind a close-up subject.
- Exposure Compensation: Set this to -0.3 or -0.7. This slightly darkens the image, preventing the bright white clouds from losing all their detail.
- Focus Mode: Single-shot autofocus (AF-S or One-Shot AF) targeted at the ancient stone structures.
Step-by-Step Guide to the Perfect Composition
Now that your settings are locked in, let us talk about how to frame your shot. A great photo tells a story, and composition is your storytelling tool. Your Machu Picchu photography 2026 journey deserves more than just standard tourist snapshots.
Your 5-Step Composition Formula
- Apply the Rule of Thirds: Imagine your viewfinder is divided by a tic-tac-toe grid. Instead of putting the main peak right in the dead center, place Huayna Picchu along the left or right vertical grid line to create a much more dynamic image. Learn more about classic framing techniques on the DPReview community guides.
- Find a Strong Foreground Element: A bare stone path, a colorful wildflower, or a grazing llama in the bottom third of your frame adds incredible depth and leads the viewer's eye into the scene.
- Look for Leading Lines: The ancient Inca stone terraces are perfect natural lines. Position yourself so the sweeping curves of the terraces guide the eye directly toward the main ruins.
- Watch the Horizon: A tilted horizon line will instantly ruin an otherwise perfect landscape. Use your camera's built-in electronic level to keep everything perfectly straight.
- Add Human Scale: The ruins are massive. Including a person wearing a bright red or yellow jacket in the distant middle ground helps viewers understand the sheer, epic scale of the stone city.
Before & After: Fixing the Classic Mistakes
Let us look at a common scenario to see how these tips come together. Imagine you are standing at the classic postcard viewpoint at 9:00 AM.
The Before (The Mistake): You leave your camera on full Auto mode, shooting in JPEG. The camera gets confused by the bright white clouds hovering over the peaks. It underexposes the ancient city, leaving the stone houses looking almost black, while the sky remains a washed-out white blob. You frame the shot with the main peak dead center, making the photo feel flat and lifeless.
The After (The Pro Solution): You switch your camera to Aperture Priority at f/8, dial in an ISO of 100, and set your file format to RAW. You dial your Exposure Compensation down to -0.7 to protect those dramatic clouds. You twist your Circular Polarizer filter until the haze vanishes and the sky turns a rich, deep blue. Finally, you step back, place a grazing llama in the bottom left corner using the Rule of Thirds, and press the shutter. In post-processing, you easily lift the shadows in the stone ruins because you shot in RAW. Your final image is rich, balanced, dramatic, and absolutely professional.
Advanced Creative Techniques
If you want your Machu Picchu photography 2026 portfolio to stand out from the millions of photos online, you need to look for unique perspectives. Don't forget to look down! The incredible precision of the Inca stonework is legendary. Switch your lens to a wider aperture like f/2.8 to isolate a single, perfectly carved stone joint while letting the rest of the ancient city fade into a soft, creamy Bokeh. This highlights the architectural genius of the site in a highly artistic way.
Another great trick is to use the changing mountain weather to your advantage. Many tourists pack up their gear when the rain starts. The secret is that the moments right after a rainstorm offer the most dramatic light of all. As the sun breaks through the wet air, the wet stones glow with a beautiful reflective sheen, and dramatic wisps of fog rise up from the valley floor. Keep your camera protected, stay patient, and you will capture images that look truly magical.
Final Check and Preparation
As you prepare for your adventure, make sure you spend time practicing with your gear at home first. You do not want to be figuring out your camera menus while standing on a narrow mountain ledge. Practice changing your aperture, adjusting your exposure compensation, and holding your camera steady without looking down at the buttons. If you are upgrading your camera body for this trip, check out the latest high-dynamic-range sensor reviews on the official Sony, Canon, or Nikon websites to find the best lightweight mirrorless options for travel.
Your Machu Picchu photography 2026 adventure is going to be an unforgettable experience. By understanding your settings, mastering the rules of composition, and working with the mountain light instead of fighting it, you will return home with a stunning gallery of images that do true justice to this ancient wonder of the world. Now pack your bags, protect your highlights, and go capture something beautiful!
Frequently Asked Questions
What is the best time of day to photograph Machu Picchu in 2026?
Early morning, right after sunrise, offers the softest light and fewer crowds, making it ideal for capturing the site without harsh shadows. Golden hour near sunset also works well, but be prepared for limited time before the site closes.
Do I need a special permit to bring photography equipment to Machu Picchu in 2026?
No, você can bring your camera gear without additional permits, but tripods are not allowed without a professional photography permit, which must be requested in advance. For 2026, check the official site for any updated drone regulations, as drones remain strictly banned.
What camera settings are best for shooting Machu Picchu's landscapes?
Use a small aperture like f/8 to f/11 to keep the entire scene in sharp focus, and set ISO to 100 for clean, grain-free images. Adjust shutter speed based on lighting, but a tripod (if permitted) or a stable surface will help with longer exposures.
How can I avoid crowds in my Machu Picchu photos during 2026?
Opt for the first entry time and head directly to iconic spots like the Sun Gate or Caretaker's Hut waiting for them to clear. Use long exposures with a neutral density filter to blur moving visitors, making crowds appear ghosted or absent.
Are there any specific areas of Machu Picchu that offer the best sunrise or sunset photo spots?
The Sun Gate (Inti Punku) is prime for sunrise, overlooking the site with stunning backlight, while the Terraces above the main plaza are perfect for sunset shots, casting warm hues on the ruins. Remember to arrive early to claim your spot, as these areas fill quickly.

Camille Bernard shares travel photography tips for every kind of traveller, from phone snapshots to full kits. She breaks down light, composition and timing so you come home with photos that actually capture how a place felt.
💬 Comments (0)
No comments yet. Be the first!