Bryce Canyon winter photography 2026 Guide
Master Bryce Canyon winter photography 2026 with our expert guide to capturing snow-dusted orange hoodoos.
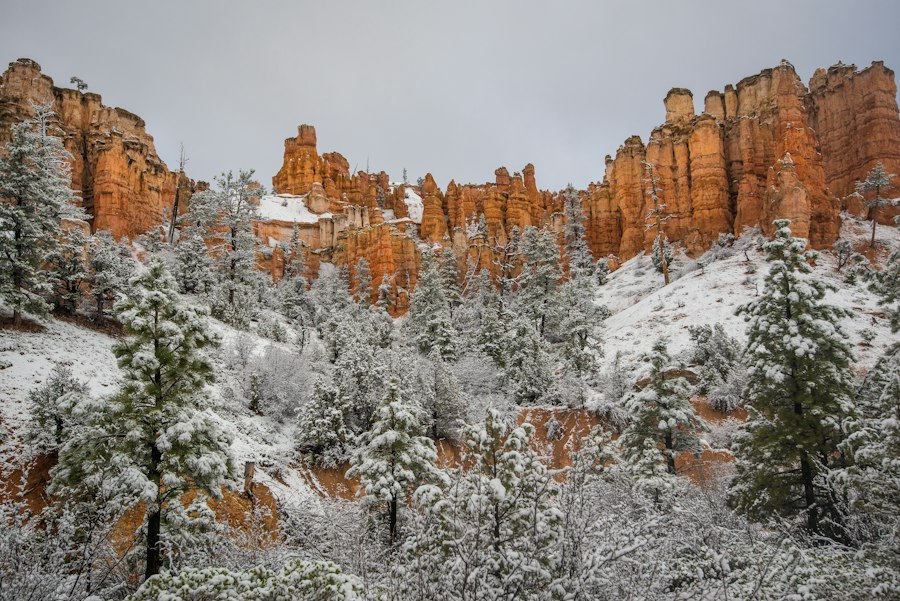
If you want to capture the ultimate snowy landscape this season, a Bryce Canyon winter photography 2026 excursion is the absolute peak of creative adventure. There is nothing quite like the contrast of brilliant orange hoodoos dusting under a fresh blanket of white snow. I still remember my very first trip to this Utah masterpiece during a sub-zero January morning. I stepped out onto the rim, my fingers freezing, and snapped what I thought would be a masterpiece. When I looked at the LCD screen, my heart sank. The brilliant white snow looked like a muddy, depressing grey, and the vibrant orange stone looked completely washed out. I had fallen into the classic winter exposure trap! In this guide, I will coach you through the exact steps so you can avoid my early mistakes and create breathtaking images during your Bryce Canyon winter photography 2026 journey.
Why Winter in Bryce Canyon is Different in 2026
First, let us look at what makes this national park so special during the colder months. During summer, Bryce Canyon is packed with tourists, and the harsh midday sun creates deep, unforgiving shadows. In winter, the low angle of the sun acts like a giant, natural softbox. This softer light glides across the amphitheater, illuminating the delicate details of the hoodoos all day long. Plus, the crowd level drops to almost nothing, giving you the peaceful space you need to compose your frames. Your photos will look clean, serene, and deeply dramatic if you master the unique challenges of shooting in freezing, high-altitude conditions.
Understanding the Gear and Technical Challenges
The secret is preparing both your body and your camera for the extreme cold. Bryce Canyon sits at over 8,000 feet of elevation. This means the air is thin, the wind is biting, and your camera gear will behave differently than it does in warm weather. To get the most out of your Bryce Canyon winter photography 2026 trip, you need to pack smart and understand how cold temperatures affect your digital sensors.
Must-Have Winter Gear List
- Spare Batteries: Lithium-ion batteries drain rapidly in freezing temperatures. Keep at least two spares in your inside jacket pocket close to your body heat.
- Sturdy Tripod: High winds on the canyon rim require a heavy, stable base. Carbon fiber is ideal because it does not get as ice-cold to the touch as aluminum.
- Lens Blower and Microfiber Cloths: Snowflakes falling on your warm lens will melt instantly and create water spots. Keep a blower handy to blast dry snow off before it melts.
- Circular Polarizer (CPL): This filter reduces glare off the snow and deepens the blue of the winter sky.
Before and After: The Muddy Snow Fix
Let us talk about a real-world scenario. In my early days, I did not understand how camera light meters worked. Your camera is programmed to see the world as neutral grey. When your lens is pointed at a bright, white field of snow, the camera thinks, "Wow, this is too bright!" and automatically darkens the image.
The Before: A photo of Sunrise Point with dull, grey snow, flat orange hoodoos, and a sky that looks washed out and lifeless.
The After: By adjusting the Exposure Compensation dial to +1 or +1.5 stops, I forced the camera to let in more light. Suddenly, the snow was a crisp, dazzling white, and the orange hoodoos popped with radiant warmth, just as my eyes saw them.
Winter Photography Golden Rule: When shooting bright snow, always dial your Exposure Compensation to the positive side (+1 to +1.7). Trust your histogram, not your eyes, to ensure your whites stay brilliantly white without clipping the highlights.
Step-by-Step Guide to Camera Settings
Now try this practical setup. Do not let the buttons on your camera intimidate you. We are going to break down the key settings so you can confidently adjust them on the fly during your Bryce Canyon winter photography 2026 shoot.
Step 1: Shoot in RAW vs JPEG
First, switch your camera quality setting from JPEG to RAW. While JPEG files are smaller and easier to share immediately, they compress the image data and throw away valuable color information. A RAW file saves every bit of data your sensor captures. If you need to recover details in the bright white snow or the dark shadows of the canyon floor, RAW gives you the latitude to do so in post-processing. You can learn more about this on the Adobe RAW vs JPEG tutorial.
Step 2: Control Your ISO
Keep your ISO as low as possible, ideally at ISO 100 or 200. ISO measures your camera sensor's sensitivity to light. A higher ISO allows you to shoot in darker conditions, but it introduces digital noise (graininess) into your image. Because snow reflects a massive amount of sunlight, you will have plenty of light to work with, allowing you to keep your images clean and sharp at a low ISO.
Step 3: Master the Aperture for Depth or Bokeh
For sweeping landscapes where you want the entire canyon sharp from the nearest snow-dusted pine needle to the furthest horizon, use a narrow aperture like f/8 or f/11. However, if you want to isolate a single beautiful detail, like a frosted pine cone, use a wide aperture like f/2.8 or f/4. This will create a beautiful, blurry background known as Bokeh, making your main subject pop out dramatically against a soft, creamy backdrop. To understand how different lenses handle these settings, check out the lens databases on DPReview.
Recommended Settings for Winter Landscapes
- File Format: RAW
- Shooting Mode: Aperture Priority (A or Av)
- Aperture: f/8 for deep landscapes, f/2.8 for creative Bokeh
- ISO: 100 (or lowest native setting)
- Focus Mode: Single-point Autofocus
- Exposure Compensation: +1.0 to +1.5 EV
Compositional Techniques for Bryce Canyon
Now that your settings are dialled in, how do you compose a shot that makes people stop and stare? Don't forget to look beyond the grand vistas. The sheer scale of Bryce Canyon can be overwhelming, but great composition helps guide the viewer's eye through the chaos of thousands of stone spires.
The Rule of Thirds
Imagine your viewfinder is divided by two horizontal and two vertical lines, creating a grid of nine equal rectangles. The Rule of Thirds suggests placing your most important elements along these lines or at their intersections. Instead of placing the horizon directly in the middle of your frame, place it along the bottom third line to emphasize a dramatic, cloud-filled winter sky, or along the top third line to focus the viewer's attention on the intricate details of the hoodoo maze below.
Using Leading Lines
Snow-covered trails, frosted handrails, and the natural ridges of the canyon walls make perfect leading lines. These lines act as visual pathways, drawing the viewer's eye from the edge of the frame deep into the heart of your Bryce Canyon winter photography 2026 composition. Look for curved paths winding down into the amphitheater from Sunset Point to add a sense of depth and journey to your work.
Creating Contrast and Scale
The bright white snow and the fiery orange stone provide natural color contrast. You can enhance this by looking for a single green pine tree dusted with snow to add a third color element. To show the true, immense scale of the canyon, try to include a tiny human element, like a hiker on a distant trail, or a lone bird soaring between the giant spires.
Protecting Your Gear in the Field
Before you pack up, let me share one crucial tip that will save your camera from destruction. When you bring a freezing cold camera inside a warm visitor center or hotel room, condensation will instantly form all over the cold metal and glass. This moisture can seep into the camera body and ruin the delicate electronics.
The secret to preventing this is simple: before you step indoors, place your camera inside a sealable plastic bag (like a Ziploc) while you are still out in the cold air. When you go inside, the condensation will form on the outside of the plastic bag, not on your precious camera gear. Let your gear warm up slowly inside the bag for an hour before taking it out. This simple trick is a lifesaver for your Bryce Canyon winter photography 2026 adventure.
You now have the knowledge, the settings, and the creative techniques to capture stunning winter images. Pack your warmest layers, double-check your batteries, and get ready to experience the quiet, frozen magic of Utah. I cannot wait to see the incredible images you create during your Bryce Canyon winter photography 2026 expedition!
Frequently Asked Questions
What are the best months for winter photography in Bryce Canyon in 2026?
January and February typically offer the most reliable snow cover and dramatic frozen hoodoos. December and early March can also work well, but conditions vary more.
Do I need snowshoes or microspikes for photographing Bryce Canyon in winter?
Yes, traction devices like microspikes or snowshoes are essential on icy trails such as Queens Garden and Navajo Loop. Many viewpoints near the rim may also be packed snow or ice.
What camera settings work best for Bryce Canyon's snowy red hoodoos in winter?
Use a polarizing filter to control glare and boost contrast, and bracket exposures because snow and dark rock create extreme dynamic range. A slight overexposure helps keep snow looking white, not gray.
When is the best light for winter photography at Bryce Canyon?
Sunrise and sunset offer the softest, most colorful light on the snow-covered hoodoos. Midday can be harsh, but it is useful for revealing shadow detail in the canyon's narrow formations.
Is Bryce Canyon accessible by car in winter for photography, or are roads closed?
The main park road is plowed and generally open to the Bryce Point area in winter, though temporary closures can occur during storms. Some roads may close after heavy snowfall, so check current park conditions before heading out.

Matthias Weber digs into the craft of travel photography, from camera settings to editing. He explains the technical side in plain language so you can spend less time fiddling with dials and more time shooting.
💬 Comments (0)
No comments yet. Be the first!