Zhangjiajie fog photography 2026 guide
Master Zhangjiajie fog photography 2026 with our expert guide to camera settings, composition, and shooting misty mountain peaks.
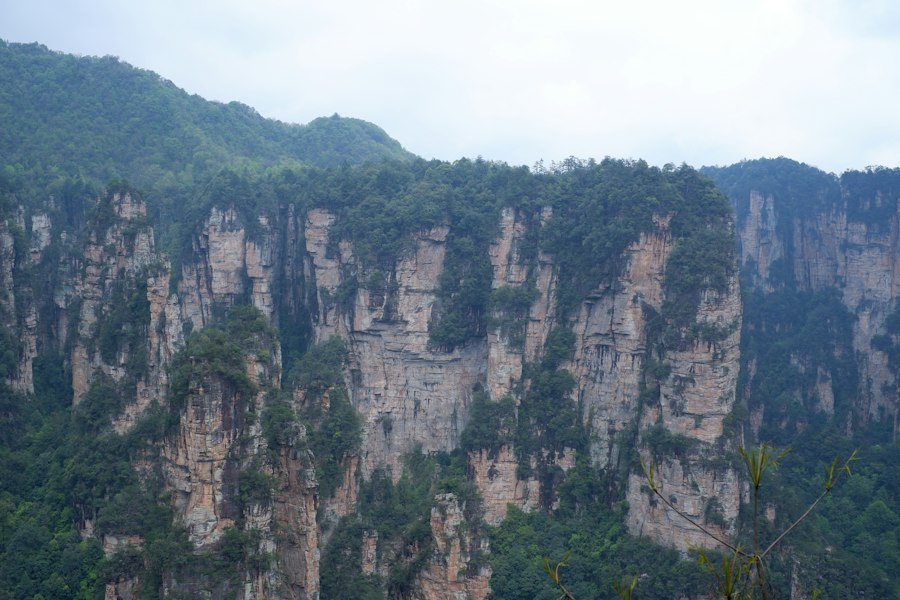
If you want to master Zhangjiajie fog photography 2026 has brought us the best weather patterns and updated park access we have seen in years. I still remember my very first trip to the Wulingyuan Scenic Area. I hiked for two hours in the damp cold, lugged fifteen pounds of gear up thousands of stone steps, and reached the Tianzi Mountain viewpoint just as a thick blanket of white rolled in. I fired off fifty shots, excited to see my epic landscape photos. When I checked my camera screen, all I saw was a flat, featureless wall of gray. My pillars were completely washed out, and the fog looked like bad digital noise. It was a total failure! But that mistake taught me how to read mountain mist and dial in the correct camera settings. Today, I will show you how to turn those milky conditions into dramatic, fine-art masterpieces.
Why Zhangjiajie Mist Demands a Unique Photographic Strategy
The quartzite sandstone pillars of Hunan Province are famous worldwide, but photographing them shrouded in low-hanging clouds requires a complete shift in how you see light. The secret is treating the fog not as an obstacle, but as a giant natural softbox that simplifies your composition. Without fog, these mountain ranges can look busy and distracting. When the mist rolls through the canyons, it cuts out background clutter and highlights the sharp silhouettes of the stone spires.
In 2026, camera sensors offer incredible dynamic range, but mist still tricks built-in light meters every single time. Camera meters are designed to calculate exposure based on a neutral middle gray. When your lens is pointed at a bright sea of white fog, your camera thinks the scene is too bright and automatically darkens the image. The result? Muddy, gray pictures that look nothing like the magical atmosphere you see with your own eyes. To beat this, you must take full manual control of your camera settings.
Essential Camera Gear for Misty Mountain Landscapes
Before you board the cable car, you need to pack smart. Moisture is the ultimate enemy of electronic gear, and the humidity in the park stays exceptionally high year-round.
- A Weather-Sealed Camera Body: Whether you shoot full-frame or crop-sensor, ensure your camera can handle constant water droplets.
- A Versatile Zoom Lens: A 24-70mm lens covers wide vistas, while a 70-200mm lens lets you isolate single spires floating above the clouds.
- A Sturdy Carbon Fiber Tripod: High winds on the edge of the cliffs can cause micro-shake during longer exposures.
- Microfiber Cloths and Rain Covers: Bring twice as many wiping cloths as you think you need. You will be wiping your front lens element constantly.
- Circular Polarizer Filter (CPL): This filter cuts reflections on wet leaves and increases the contrast between the dark rocks and the pale fog.
If you are upgrading your setup for your trip, take a look at the latest mirrorless camera features on the DPReview guide to modern landscape cameras to see how current weather-sealing ratings compare.
Mastering Camera Settings for Zhangjiajie Fog Photography 2026
Let us break down the exact technical settings you need to dial into your camera to get razor-sharp images in damp conditions.
Exposure Compensation and RAW Shooting
First, let us look at how to get bright, crisp whites. Since fog confuses your meter, you must use Exposure Compensation. Dial your exposure up by +0.7 to +1.7 EV. This forces the camera to brighten the image, keeping the fog looking white instead of dingy gray. Always shoot in RAW format rather than JPEG. RAW files preserve all the uncompressed color and dynamic range data, giving you the latitude to recover shadow detail in the dark pine trees without destroying the soft gradient of the mist. You can read more about file format capabilities in the Adobe Camera RAW tutorial.
Understanding ISO, Aperture, and Depth of Field
To keep your entire image sharp from the foreground trees to the distant peaks, set your Aperture between f/8 and f/11. This range is usually the sweet spot for lens sharpness, avoiding the image softness caused by diffraction at f/22. Keep your ISO at its native base setting, usually ISO 100, to minimize digital grain in the smooth fog areas. If you want a soft, blurry background behind a single tree branch, open your aperture to f/2.8 to create pleasing Bokeh, which is the smooth aesthetic quality of out-of-focus background blur.
Golden Rule of Mist Photography: Protect your highlights at all costs. Use your camera histogram to ensure the white arch of the fog pushes to the far right side of the graph without touching the wall, which indicates blown-out clipping.
Step-by-Step Guide: Capturing the Avatar Mountains in the Cloud Sea
Now try this proven step-by-step workflow when you step up to famous lookouts like the Bailong Elevator, Yuanjiajie, or Tianzi Mountain.
Step 1: Check the Humidity and Rain Forecast
The absolute best fog occurs right after a light rain shower when the sun starts to break through. High humidity around 90 percent combined with low wind speeds means the mist will hang inside the canyon valleys rather than blowing away quickly.
Step 2: Compose with the Rule of Thirds
Do not place the horizon directly in the middle of your frame. Divide your viewfinder into an imaginary three-by-three grid. Place your main rock pillar along one of the vertical grid lines, and let the sea of fog occupy the bottom two-thirds or top two-thirds of the image. This rule of thirds framing creates instant visual balance and leads the viewer's eye through the foggy depth.
Step 3: Dial in Your Recommended Settings
Set your tripod on solid ground, turn off your lens image stabilization when mounted on a tripod, and lock in your base parameters.
- Shooting Mode: Manual (M) or Aperture Priority (Av)
- ISO: 100 (or base ISO)
- Aperture: f/8 to f/11
- Shutter Speed: Determined by available light, typically 1/15s to 2 seconds for smooth mist motion
- White Balance: Daylight or Daylight Presets (around 5500K) to preserve natural mountain coolness
- Focus Mode: Single-point Autofocus locked onto a high-contrast edge of a rock cliff
Step 4: Use a Two-Second Shutter Timer
Pressing the shutter button with your finger causes tiny vibrations that blur fine details like distant pine needles. Use a remote shutter release cable or set your camera internal self-timer to two seconds. This ensures your hand is completely off the camera when the shutter opens.
Before and After: Fixing Dull Mist Photos
Let us look at a real-world scenario to see how these techniques transform an average snapshot into a gallery-worthy print.
The Before Scenario: You stand at the Enchanting Stop viewpoint using Auto Mode. The camera selects ISO 400, f/4, and 1/500th of a second. Because the camera meter sees bright mist, it underexposes the scene. The final JPEG photo shows dark gray fog, grainy shadows in the stone pillars, and a messy composition where the background rocks blend completely into the sky.
The After Scenario: You mount your camera on a tripod and switch to Manual mode, shooting RAW. You lock your ISO at 100 and select f/8 for maximum sharpness across the frame. You set your Exposure Compensation to +1.3 EV to make the mist gleam white. Using a telephoto zoom, you crop tightly on a single pillar breaking through the clouds, applying the rule of thirds. The resulting image boasts crisp detail on the wet rock face, bright luminous mist, zero digital noise, and dramatic visual impact.
Final Tips for Your Zhangjiajie Fog Photography 2026 Trip
Don't forget to keep your equipment safe while chasing the storm. Carry plenty of silica gel packs inside your camera bag to absorb moisture when transitioning from cold outdoor lookouts to warm hotel rooms. Condensation can build up inside your lens barrel if you change environments too fast. If fog becomes so dense that you completely lose visibility, stay patient! Mountain weather shifts in seconds. A sudden gust of wind can clear an entire valley, revealing breathtaking sandstone spires emerging from the clouds right in front of your lens.
By preparing your gear and mastering exposure adjustments, your Zhangjiajie fog photography 2026 portfolio will showcase the ethereal, mystical atmosphere of these ancient mountains exactly as you dreamed. Pack your tripod, watch the weather radar, and get ready to create breathtaking landscape images!

Matthias Weber digs into the craft of travel photography, from camera settings to editing. He explains the technical side in plain language so you can spend less time fiddling with dials and more time shooting.
💬 Comments (0)
No comments yet. Be the first!