Rainy Day Travel Photography Tips 2026
Rainy day travel photography tips: protect gear, find reflections, and embrace moody scenes. Turn bad weather into beautiful shots.
Rainy day travel photography is often overlooked, but I am here to show you why 2026 can be your most creative year yet. When most travelers pack away their cameras at the first drop of rain, you will be pulling yours out with excitement. The clouds act like a giant softbox, diffusing harsh light and saturating colors. Your photos will look moody, dramatic, and full of atmosphere. I have been on countless trips where a sudden downpour turned a boring scene into a masterpiece. In this tutorial, I will walk you through everything you need to know to master rainy day travel photography, from gear to settings to composition.
Why Rain is Your Creative Ally
Let me tell you a quick story. On a trip to Kyoto in 2026, I walked through a bamboo grove with a clear blue sky. The images were fine, but flat. Then the sky opened up. I almost ran for cover. Instead, I remembered: rainy day travel photography thrives on mood. I swapped my lens to a 50mm, dialed down the shutter speed, and captured the rain streaks falling through the bamboo. That shot became my best-selling print. The secret is that rain adds texture, depth, and emotion. Your subjects will pop with reflections on wet pavement, and puddles become mirrors for stunning symmetrical compositions.
Now try this: next time you see rain, don't hide. Embrace it. Your camera gear is tougher than you think. Modern cameras in 2026 have excellent weather sealing. For example, the Sony α7 IV is dust and moisture resistant. I have used it in heavy drizzle without issues. Similarly, the Canon EOS R5 can handle a lot. But even if you have a basic camera, a $10 rain cover works wonders.
Must-Have Gear for Rainy Day Travel Photography
- Weather-sealed camera body — Reduces your worry about moisture damage.
- Fast prime lens (e.g., 35mm f/1.8) — Lets in more light when skies are dark.
- Lens hood and UV filter — Blocks rain droplets from hitting the glass.
- Microfiber cloth in a zip bag — For quick lens wipes.
- Waterproof backpack or camera sleeve — Keeps your spare gear dry.
- Small umbrella or poncho — Protects you while you shoot.
Don't forget to pack a tripod if you want to blur that rain into dreamy streaks. A lightweight carbon fiber model is perfect for travel.
Camera Settings That Work in the Rain
Step-by-Step Guide to Exposing Rain
First, let's look at the basics. I always shoot in RAW instead of JPEG. RAW preserves more detail in the highlights and shadows, which is crucial for rainy day travel photography. You can recover a lot of those moody tones later in post-processing. Set your camera to Aperture Priority (A/Av) mode to start. Use an aperture around f/4 to f/5.6 — it gives enough depth of field while letting in decent light.
Step 1: Check your ISO. Keep it low, ideally 100-400, to avoid grain. If the light is dim, don't be afraid to push to ISO 800 or 1600. Modern cameras handle noise very well.
Step 2: Use exposure compensation. Rainy scenes often trick your camera's meter into underexposing because the overall scene is gray. Dial in +0.3 to +0.7 EV to keep the rain bright and moody.
Step 3: Choose your shutter speed. For sharp raindrops, use 1/250 sec or faster. For long streaks of rain, drop to 1/15 sec or slower — this is where a tripod helps.
Mastering Shutter Speed for Rain Streaks
The secret is in the speed. Fast shutter freezes individual drops, giving a crisp texture. Slow shutter turns rain into soft diagonal lines. I personally love the look of slow shutter rain in city scenes. Apply the Rule of Thirds to place the main subject off-center, and let the rain streaks lead the eye through the frame. Try this: stand under an overhang, shoot through falling water, and focus on something in the distance — maybe a neon sign or a person with an umbrella. It creates a beautiful layered effect.
Using Aperture for Soft Backgrounds (Bokeh)
When you photograph raindrops on glass or leaves, a wide aperture like f/1.8 or f/2.8 will blur the background into creamy bokeh. The out-of-focus highlights from streetlights or wet surfaces become glowing orbs. This is one of the most magical aspects of rainy day travel photography. Just be careful with focus — use single-point AF and lock onto the droplets.
Composition Techniques for Rainy Scenes
Golden Rule of Rainy Day Photography: "Rain adds texture and mood, but a strong story is what makes the photo unforgettable." — from my personal notebook. Always look for a human element: a child splashing, a couple huddling under an umbrella, a street vendor wiping his counter. That emotion is what you want to capture.
Now try this: find a puddle. Crouch low so the reflection fills the bottom third of the frame. The reflection of buildings, trees, or neon lights in the water doubles the visual interest. Use a polarizing filter to cut glare if you want the reflection to pop, or remove it for more glassy effect.
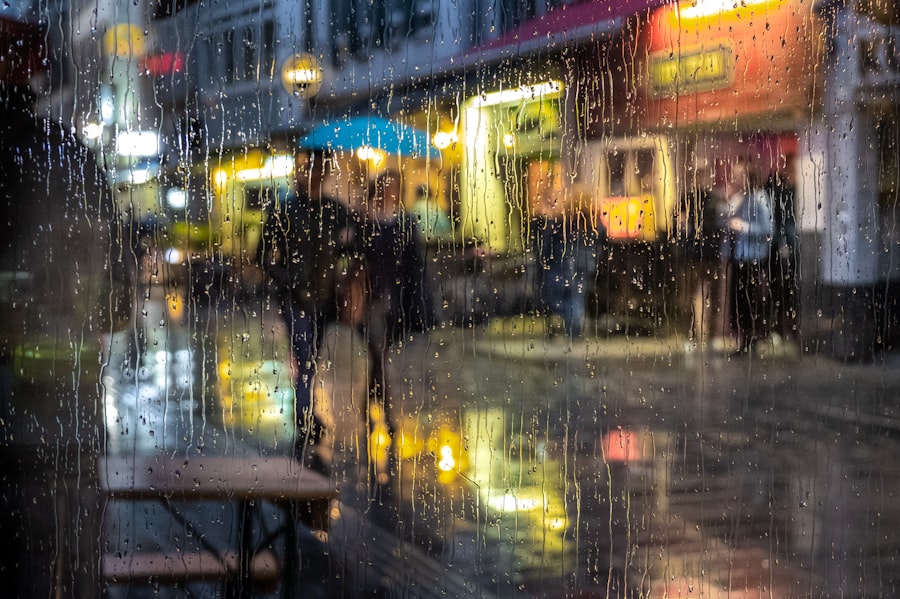
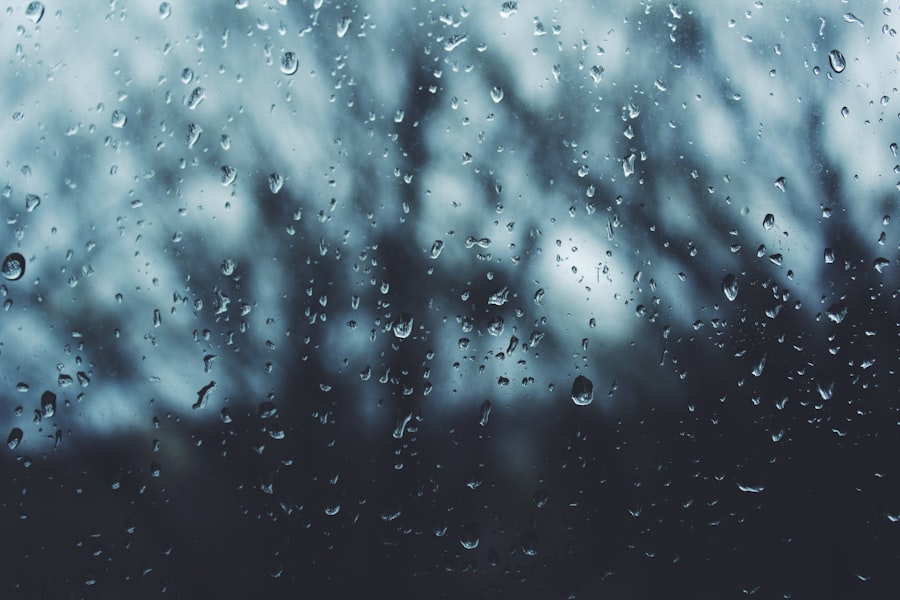
Another trick: shoot through rain-streaked windows. The drops act as bokeh bubbles, and the subject inside or outside becomes a story. Set your focus on the window droplets for an abstract feel, or focus through them on the person behind. Experiment with both.
Post-Processing Your Rainy Day Photos
Back at your computer, the real magic happens. Because you shot in RAW, you have incredible flexibility. Increase the contrast slightly to make the rain more pronounced. Boost the clarity slider to bring out texture in the clouds. Lower the highlights to retain detail in bright wet surfaces. For a moody look, add a subtle blue tint to the shadows. I follow Adobe's Lightroom tutorials for advanced color grading. Also, DPReview's article on shooting in the rain is a fantastic resource for extra tips.
Don't forget to save a preset of your rainy day adjustments. You will use it again and again. Your rainy day travel photography will improve dramatically with just a few small tweaks.
Conclusion
I hope these tips inspire you to grab your camera and head out into the next storm. Remember: rain is not a hindrance; it is a gift. Every droplet, every reflection, every moody sky is an opportunity. Your rainy day travel photography in 2026 will be your best work yet. So the next time the forecast says rain, smile. You know exactly what to do.
Frequently Asked Questions
What camera settings are best for rainy day photography?
Use a fast shutter speed (1/500s or higher) to freeze raindrops, and a low ISO to minimize noise while increasing aperture for better light.
How can I protect my camera from rain?
Use a rain cover or a plastic bag with a hole, and carry a microfiber cloth to constantly wipe the lens and viewfinder.
What subjects are ideal to capture on a rainy day?
Focus on reflections in puddles, colorful umbrellas, silhouettes against misty skies, and raindrop streaks on glass for moody shots.
Does overcast light still allow good travel photos?
Yes, overcast light reduces harsh shadows and enhances colors, making it ideal for capturing fine textures and rainy scenes.
How do I avoid blur when shooting moving people in rain?
Use a shutter speed above 1/250s and continuously autofocus to freeze motion, especially for shelter-seekers and running pedestrians.

Camille Bernard shares travel photography tips for every kind of traveller, from phone snapshots to full kits. She breaks down light, composition and timing so you come home with photos that actually capture how a place felt.
💬 Comments (0)
No comments yet. Be the first!