5 Golden Hour Photography Tips for Travelers
Learn essential golden hour photography tips for travel. This guide covers camera settings, composition, and timing for stunning sunset photos in 2026.
If you want to capture breathtaking travel photos, mastering golden hour photography tips is the single most important skill you can learn. I’ll show you exactly how to turn that warm, fleeting light into jaw‑dropping images — no expensive gear required. Whether you’re shooting in a bustling city or a quiet beach, these five tips will transform your travel photography in 2026.
1. Arrive Early and Scout Your Location
The secret to great golden hour shots is preparation. I once missed a spectacular sunrise in Cappadocia because I arrived just five minutes late — the balloons were already half‑inflated and the light was harsh. Don’t let that happen to you. Use apps like PhotoPills or The Photographer’s Ephemeris to know exactly when golden hour starts. Now try this: arrive at least 30 minutes before sunset or sunrise. Walk around, find leading lines, and test your composition. Your photos will look far more intentional when you aren’t rushing.
Step‑by‑Step: Scouting Like a Pro
- Check the golden hour timing for your location using a dedicated app.
- Arrive early and identify three potential foreground elements (rocks, trees, people).
- Frame your shot using the rule of thirds — place the horizon on the top or bottom third line.
- Wait for the light to hit your subject. Patience is everything.
Before & After: My first golden hour photo in Paris was flat and boring — I shot from the wrong angle. After scouting the Pont Alexandre III bridge beforehand, I captured the Eiffel Tower with warm reflections on the Seine. That simple change made all the difference.
2. Master Your Camera Settings for Golden Hour
Golden hour light changes fast. One minute it’s soft and golden, the next it’s deep orange. To keep up, you need to understand a few key settings. First, let’s look at ISO. Keep it as low as possible (100–400) to avoid noise. Next, aperture. Use f/2.8–f/5.6 for creamy bokeh backgrounds, or f/8–f/11 for landscapes where you want everything sharp. Shutter speed will vary — start around 1/125s and adjust. These golden hour photography tips will help you nail exposure every time.
Recommended Settings for Golden Hour
- ISO: 100–400 (use 100 when light is still bright)
- Aperture: f/2.8 for portraits, f/8 for landscapes
- Shutter speed: 1/60s to 1/250s, depending on light
- White balance: Daylight or Cloudy (around 5500K) to keep warmth
- File format: RAW (more on that below)
I remember failing a sunset shot in Santorini because I left the camera on Auto. The sky was blown out and the white balance made everything blue. That’s when I learned to switch to Manual and use exposure compensation — a quick dial that lets you brighten or darken the image without changing aperture. For backlit subjects, dial in +0.7 to +1.0 to keep faces visible.
Golden Rule Cheat Sheet: When shooting directly into the sun, use spot metering on your subject’s face or the brightest part of the sky. Then adjust exposure compensation to +0.7. Your golden hour portraits will glow without losing detail.
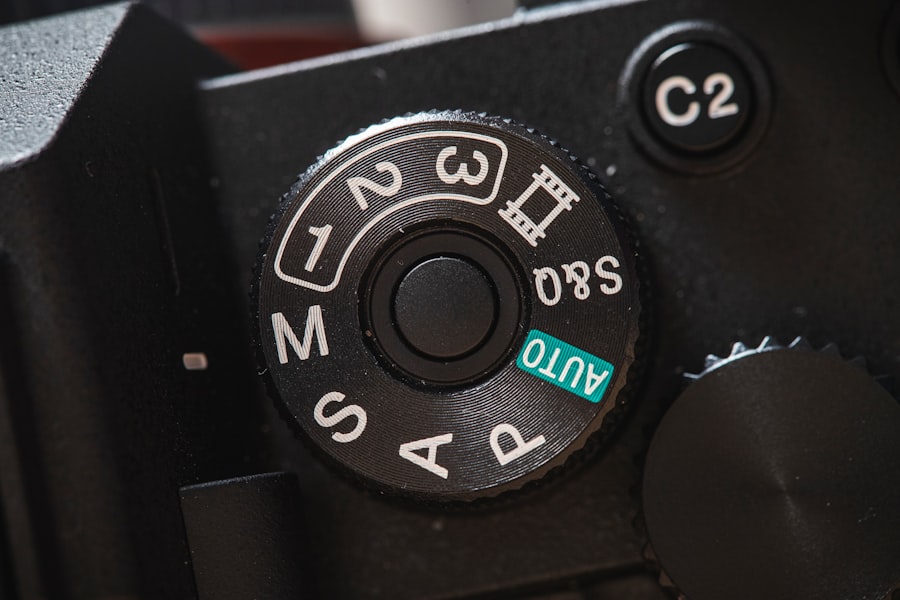
3. Shoot in RAW to Save Your Golden Hour Photos
If you only take one piece of advice from these golden hour photography tips, let it be this: shoot RAW, not JPEG. RAW files capture far more data, especially in the highlights and shadows. During golden hour, the dynamic range is huge — you’ll have bright skies and dark foregrounds. With RAW, you can recover those details in editing. Don’t forget to check your camera’s manual to enable RAW mode. For example, Sony cameras (like the α7 IV) have a dedicated menu option under “Image Quality.”
I once deleted a stunning golden hour shot from Kyoto because I shot JPEG and the sky was completely blown. Now I always shoot RAW + JPEG, and I use Adobe Lightroom to pull back highlights by 2–3 stops. The difference is night and day. Adobe’s tutorial on RAW vs. JPEG explains exactly why you need that extra flexibility.
4. Use Foreground Interest to Create Depth
Golden hour light is beautiful, but without a strong subject, your photos can feel empty. The secret is to include something in the foreground — a silhouette, a person, a flower, or a rock. This adds depth and draws the viewer’s eye into the scene. Now try this: place your subject in the lower third of the frame and let the golden light wrap around them. For silhouettes, expose for the sky (meter on the bright area) and your subject will turn black. That contrast makes for dramatic golden hour photography tips in action.
Must‑Have Gear for Foreground Shots
- Wide‑angle lens (16–24mm) to capture both foreground and sky
- A sturdy tripod for sharp long exposures (if light fades)
- A remote shutter release or self‑timer to avoid camera shake
- Lens hood to reduce flare when shooting toward the sun
I remember a trip to the Scottish Highlands where I shot a lonely tree against a golden sunset. Without a foreground element, the photo looked empty. I crouched low and included a patch of heather in the bottom corner. That simple change created a three‑dimensional feel. Your photos will look instantly more professional.
5. Embrace the Magic of Bokeh and Lens Flare
Golden hour is the perfect time to play with bokeh — those dreamy, out‑of‑focus circles of light. Use a wide aperture (f/1.8–f/2.8) and position your subject so that the sun is just out of frame or behind them. The light will scatter into beautiful orbs. Don’t forget to shoot a few frames with intentional lens flare; it adds a cinematic, warm mood. Just be careful not to overdo it — keep the flare soft by tilting your lens slightly.
One of my favorite golden hour photography tips is to use a 50mm prime lens for this effect. The Nikon 50mm f/1.4 or similar lenses are affordable and create stunning bokeh. Practice moving your angle until the sun peeks through leaves or a building edge. That little spark of light transforms a good portrait into a magical one.
Final Thoughts: Keep Practicing
These golden hour photography tips are designed to build your confidence. Start with one tip at a time — maybe scouting tomorrow morning, or switching to RAW on your next trip. Remember, even pros miss focus or overexpose sometimes. The key is to keep shooting, reviewing, and learning. In 2026, your travel photos will thank you for mastering this beautiful light.
Now get out there and chase the golden hour. I can’t wait to see what you create.
💬 Comments (0)
No comments yet. Be the first!