Top 10 Copenhagen Tivoli Night Photography Spots 2026
Discover the most magical Copenhagen Tivoli night photography spots for 2026. Capture illuminated rides and fairy-tale lights.
Top 10 Copenhagen Tivoli Night Photography Spots 2026
If you are hunting for the best Copenhagen Tivoli night photography spots in 2026, you have come to the right place. Tivoli Gardens transforms after sunset into a dreamscape of twinkling lanterns, illuminated facades, and shimmering reflections that beg to be captured. As a travel and photography enthusiast, I have spent countless evenings wandering these historic grounds, dialing in my settings, and finding the perfect angles. In this guide, I will walk you through ten specific locations inside the park, sharing exact walking directions, historical context, and recommended camera settings for each. By the end, you will have a complete roadmap for an unforgettable night of photography at one of the world's oldest amusement parks.
Pro Photography Tip: Arrive at Tivoli at least 30 minutes before sunset. This gives you time to scout your first location and capture the "blue hour" transition, when the sky turns a deep indigo and the park lights begin to pop. Use a tripod from this moment onward to keep your images sharp at low ISOs.
1. The Nimb Building Facade - A Fairy Tale Entry
Your first stop should be the Nimb building, the magnificent Moorish-inspired structure that greets you near the main entrance on Vesterbrogade. This is arguably the most photographed facade in all of Tivoli, and for good reason. The intricate arches, minarets, and ornamental details are bathed in warm golden light after dark, creating a scene straight out of a storybook. The lighting here is soft but directional, emphasizing the textures of the brickwork and the carved stone.
Best Angles and Framing
For the most dramatic composition, stand directly in front of the main entrance on the cobblestone plaza. Use a wide-angle lens (16-24mm full-frame equivalent) to capture the full height of the building. Frame the shot so that the central arch is your focal point, with the glowing lanterns on either side leading the eye inward. You can also step back toward the flower beds and use the low hedges as foreground elements to add depth. Avoid shooting from a low angle here, as the crowds can create messy silhouettes. Instead, keep your camera at chest height for a clean, balanced composition.
Camera Settings for the Nimb Facade
Set your aperture to f/8 for maximum sharpness across the entire building. Use a shutter speed around 2-4 seconds, depending on how bright the facade looks through your viewfinder. Keep your ISO at 100 or 200 to minimize noise. If you have a remote shutter release, use it to avoid any camera shake. The vibe here is grand and opulent, so let the architecture dominate the frame. A polarizing filter can help reduce reflections from the glass windows on the ground floor.
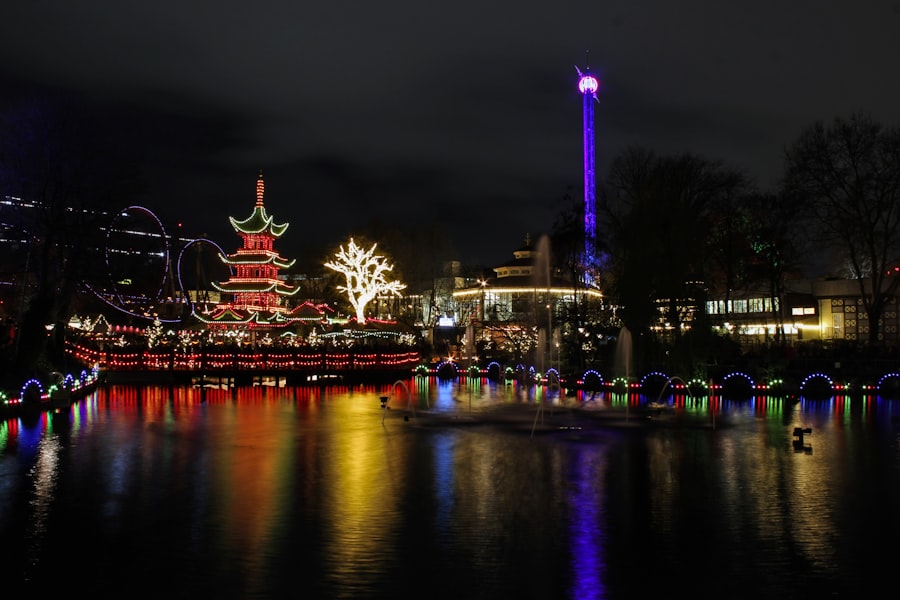
2. The Tivoli Lake - Mirror of Lights
Walk past the Nimb building and continue south until you reach the Tivoli Lake, a small but incredibly photogenic body of water that sits at the heart of the park. This is one of the most rewarding Copenhagen Tivoli night photography spots because the reflections double the visual impact of every light source. The lake is surrounded by trees, the Chinese Pagoda, and the Tivoli Castle, all of which cast gorgeous mirror images on the still water.
Composition Tips for Reflections
Position yourself on the eastern shore, near the small bridge that crosses the lake. From here, you can include the entire pagoda in the reflection. Use a 24-70mm lens at around 35mm to get a balanced view of the structure and its mirrored counterpart. Pay close attention to the water surface; if it is too rippled from wind or boats, you might lose the reflection. Wait for a calm moment. The lighting here comes from the pagoda's lanterns and the underwater lights that illuminate the lake's edges, creating a soft, ethereal glow.
Walking Directions to the Best Shore
From the Nimb building, follow the main path south past the flower garden. You will see the lake on your left just after the Pantomime Theatre. Walk along the edge until you find a wooden bench near a large willow tree. This is your sweet spot. Set up your tripod here and take multiple exposures at different shutter speeds to ensure you capture the reflections at their sharpest. A shutter speed of 3-5 seconds at f/11 with ISO 200 works beautifully.
3. The Chinese Pagoda and Tivoli Castle
These two structures sit side by side on the southern edge of the lake, and they are among the most beloved landmarks in the park. The Chinese Pagoda, built in 1900, is a three-tiered wooden tower with curved eaves and red-and-gold paintwork. Next to it, the Tivoli Castle (also called the Tivoli Guard Tower) offers a more medieval silhouette. At night, both are wrapped in strings of warm fairy lights that make them glow from within.
Historical Context
The pagoda was inspired by traditional Chinese architecture and originally housed a restaurant. The castle, on the other hand, was built in 1874 as part of the park's military-themed attractions. Today, they stand as photogenic relics of Tivoli's eclectic history. The lighting on the pagoda is particularly special: small lanterns are placed along each tier, creating a vertical line of light that draws the eye upward.
Lighting and Vibe
To capture both buildings together, stand on the bridge that connects the lake's eastern and western shores. Use a focal length around 24mm to fit both structures in the frame. The vibe here is romantic and serene, so consider using a longer exposure (5-8 seconds) to smooth out any water ripples in the foreground. The warm yellow lights from the pagoda contrast beautifully with the cooler blue of the evening sky, so be sure to shoot during the blue hour for maximum color impact.
Pro Photography Tip: For the pagoda, try a vertical composition that isolates the tower against the sky. Use spot metering on the brightest part of the structure to avoid blowing out the highlights. The resulting image will have a dramatic, almost cinematic feel.
4. The Rutschebanen Roller Coaster at Night
Rutschebanen is the world's oldest still-operating wooden roller coaster, dating back to 1914. At night, it becomes a striking subject for motion blur and light-trail photography. The coaster's track is outlined with small white lights, and the trains themselves carry glowing headlamps as they roar through the structure. This is one of the most dynamic Copenhagen Tivoli night photography spots for capturing movement.
Capturing Motion and Light
Position yourself near the entrance of the ride, where the track makes a sharp turn. From this angle, you can capture the train as it banks through the curve with the park lights blurred in the background. Set your shutter speed to around 1/15 or 1/30 second to create a sense of motion while keeping the train partially sharp. Use a tripod and pan your camera to follow the train for a more dynamic effect. Alternatively, use a very long exposure (10-15 seconds) to let the train's lights paint a continuous streak across the frame.
Safety and Timing
The coaster operates until around 10 PM on most nights, so plan to shoot it earlier in the evening. Stand behind the safety barriers and use a telephoto lens (70-200mm) to compress the perspective and isolate the train against the dark sky. The lighting on the track is consistent, but the trains themselves provide the most visual interest. Wait for a train with a full passenger load, as the extra weight creates a louder, more dramatic pass.
5. The Pantomime Theatre - A Stage of Shadows
Located near the lake's eastern edge, the Pantomime Theatre is a beautiful open-air stage with a distinctive Chinese-inspired roof. At night, the stage is lit by spotlights that cast dramatic shadows on the painted backdrop. This is a fantastic spot for silhouette photography and for capturing the interplay between light and darkness. The theatre hosts live performances during the summer, but even when empty, the stage itself is a compelling subject.
Framing the Performance
If a performance is happening, use a fast shutter speed (1/250 second or faster) to freeze the dancers or actors in mid-motion. If the stage is empty, focus on the architecture: the curved roof, the ornate columns, and the glowing lanterns that flank the entrance. Use a wide-angle lens to capture the full stage and the surrounding trees. The lighting here is warm and dramatic, with strong contrasts between the bright stage and the dark audience area.
6. The Main Entrance Gate and H.C. Andersen Boulevard
The main entrance gate on H.C. Andersen Boulevard is an iconic landmark in its own right. The gate is flanked by two tall towers topped with glowing globes, and the entire structure is festooned with thousands of fairy lights. This is a great spot for long-exposure shots that include traffic light trails from the boulevard outside the park.
Long Exposure Possibilities
Stand inside the park, about 30 meters back from the gate, to capture the full archway with the city skyline visible through it. Use a 16-24mm lens and set your aperture to f/16 for a deep depth of field. With a shutter speed of 15-30 seconds, the cars on the boulevard will create red and white light trails that lead directly into the frame. The combination of the warm park lights and the cool street lights outside creates a beautiful color contrast.
7. The Star Flyer (Himmelskibet) - City Views from Above
The Star Flyer is a massive carousel-like swing ride that lifts passengers over 80 meters into the air. At night, the ride is illuminated with blue and white LED lights, and the arms of the swing create circular patterns as they rotate. You can photograph this ride from below using a fisheye lens, or you can ride it yourself for a unique aerial perspective of the park.
Shooting from Below
Stand directly under the ride's central mast and point your camera straight up. Use a fisheye or ultra-wide lens (14-16mm) to capture the full circle of the swings. Set your shutter speed to around 1/100 second to freeze the motion of the swings, and use a high ISO (800-1600) if needed to keep the exposure bright. The pattern of the lights against the dark sky creates a mesmerizing geometric composition.
8. The Flower Garden Lantern Corridor
Near the eastern side of the park, the Flower Garden becomes a corridor of hanging lanterns after dark. Thousands of small, colorful lanterns are strung between the trees, creating a canopy of light that feels magical and intimate. This is one of the most romantic Copenhagen Tivoli night photography spots for portrait and landscape shots alike.
Leading Lines and Depth
Use a 24-70mm lens at around 35mm to capture the corridor with the lanterns forming leading lines that guide the eye into the distance. Stand at the entrance of the corridor and shoot straight down the path. The lighting here is warm and multicolored, so set your white balance to "daylight" to preserve the golden hues. A shutter speed of 1/2 second at f/4 with ISO 400 works well for a balanced exposure.
9. The Tivoli Concert Hall Modernist Contrast
For a change of pace, head to the Tivoli Concert Hall, a modernist glass-and-steel structure on the north side of the park. At night, the hall is illuminated with cool white and blue lights that contrast sharply with the warm, traditional lighting elsewhere in Tivoli. This is a great spot for architectural photography and for exploring angular compositions.
Architecture and Lighting
Use a 16-24mm lens to capture the full facade with its sweeping curves and geometric panels. The lighting here is directional and creates strong shadows, so look for interesting patterns of light and dark on the glass. Set your aperture to f/11 for maximum sharpness, and use a shutter speed of 3-5 seconds at ISO 200. The vibe here is modern and sleek, a nice counterpoint to the fairy-tale atmosphere of the rest of the park.
10. The Main Walkway (Mikkel Svanes Vej) - A Tunnel of Lights
Finally, save time for the main walkway that runs from the Nimb building toward the lake. This path is lined with large trees that are draped in thousands of fairy lights, creating a tunnel of illumination. This is the quintessential Tivoli night shot, and it never fails to impress.
Timing Your Visit
Shoot this location during the blue hour for the best results, as the sky will still have some color. Use a 24-70mm lens at around 35mm, and position yourself in the center of the path. Set your aperture to f/8 and your shutter speed to 2-3 seconds to capture the lights in sharp detail. The crowds are heaviest here between 8 PM and 10 PM, so arrive early or stay late for a clear frame.
Essential Photography Gear for Tivoli at Night
- A sturdy tripod is non-negotiable for long exposures and sharp reflections.
- A wide-angle zoom lens (16-35mm) for architecture and landscapes.
- A telephoto lens (70-200mm) for details and compression shots.
- A remote shutter release or intervalometer to minimize camera shake.
- A polarizing filter to cut reflections on water and glass.
- Extra batteries, as cold evening temperatures can drain them quickly.
- A lens cleaning cloth for condensation and fingerprints.
Final Thoughts on Capturing Tivoli After Dark
Tivoli Gardens at night is a photographer's dream. Every corner offers a new composition, a new play of light, a new mood. Whether you are drawn to the grand architecture of the Nimb building, the serene reflections on the lake, or the kinetic energy of the roller coaster, you will find endless inspiration here. The ten Copenhagen Tivoli night photography spots I have shared are just the beginning; feel free to explore off the main paths and discover your own hidden gems. Remember to check the official Tivoli website for opening hours and seasonal events, as the park occasionally hosts special light festivals and fireworks displays that add even more photographic opportunities.
For more information on visiting Tivoli, you can check out the official guide on TripAdvisor or read the detailed history on Lonely Planet. Both resources offer excellent tips for planning your visit and navigating the park.
One final word on composition: always look for ways to include foreground elements that anchor your image. A bench, a lantern, a flower bed, or even a puddle on the ground can add depth and context to your shot. And do not forget to experiment with different white balance settings to see how the park's lights shift from warm to cool depending on your Kelvin value. Tivoli is a place where creativity thrives, so trust your instincts and enjoy every minute behind the lens.
Now pack your camera bag, charge your batteries, and get ready for an unforgettable night of photography at one of Europe's most enchanting destinations. The Copenhagen Tivoli night photography spots I have outlined here will give you a solid foundation, but the real magic happens when you let the park surprise you.
Frequently Asked Questions
What is the best time to photograph Tivoli Gardens at night?
The best time is during the blue hour, just after sunset, when the lights contrast beautifully with the twilight sky.
Do I need a tripod for night photography in Tivoli?
Yes, a tripod is essential for long exposures to capture sharp images of the illuminated rides and reflections.
Which area in Tivoli offers the most photogenic night views?
The area around the main lake with the Nimb building and the Star Flyer provides iconic reflections and vibrant colors.
Are there any restrictions on photography equipment inside Tivoli?
Tripods are generally allowed, but you might need a permit for professional commercial shoots; check with Tivoli's staff.
What camera settings work well for Tivoli night shots?
Use a low ISO (100-400), a small aperture (f/8-f/11), and a slow shutter speed (1-30 seconds) for sharp, well-lit scenes.
💬 Comments (0)
No comments yet. Be the first!