Top 10 Melbourne Laneways Street Art Photo Spots
Discover the most vibrant Melbourne laneways street art photo spots for 2026, from Hosier Lane to AC/DC Lane.
Discover the Ultimate Guide to Melbourne Laneways Street Art Photo Spots
If you are searching for the best Melbourne Laneways Street Art Photo Spots, you have landed at the right place. Melbourne is famous for its hidden laneways that transform into open-air galleries, where every corner reveals a new mural, stencil, or paste-up. As a photographer, you will find endless inspiration in these narrow corridors. The city breates creativity, and the street art scene is constantly evolving. In this guide, I will walk you through ten of the most photogenic laneways, sharing insider tips on lighting, angles, composition, and framing so you can capture truly stunning images. Whether you are a seasoned pro or a beginner with a smartphone, these spots will elevate your portfolio. Let us dive into the vibrant world of Melbourne street art.
1. Why Melbourne Laneways Are a Photographer's Dream
Melbourne's laneways are not just thoroughfares; they are living, breathing canvas that showcase the city's artistic soul. The ever-changing murals, the interplay of light and shadow, and the raw urban vibe make these alleys irresistible for photographers. Each laneway has its own personality, from gritty and industrial to colorful and whimsical. The best part? You never know what you will find around the next corner. Street art here is respected and protected, meaning artists from around the world come to leave their mark. This dynamic environment means your photos will always feel fresh and unique. For a deeper dive into the history of Melbourne's street art scene, check out Lonely Planet's guide to Hosier Lane for background context.
Pro Photography Tips: When shooting in laneways, look for natural leading lines created by brick walls, pipes, and pavement. Use these to draw the viewer's eye into the frame. Also, shoot in aperture priority mode (f/5.6 to f/8) to keep the entire mural sharp while maintaining a sense of depth.
2. Hosier Lane: The Iconic Starting Point
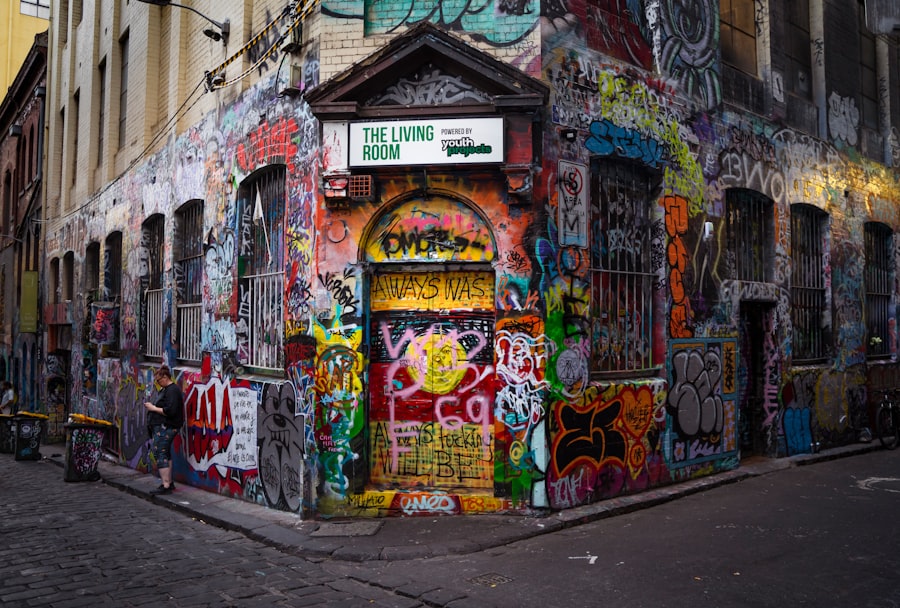
Hosier Lane is arguably the most famous of all Melbourne Laneways Street Art Photo Spots. Located just off Flinders Street, this cobblestone alley is a riot of color and texture. The walls are covered floor-to-ceiling with murals, tags, and paste-ups that change almost weekly. The vibe here is electric, with tourists and locals mingling to admire the art. For photographers, Hosier Lane offers incredible opportunities for both wide-angle shots and intimate close-ups. The narrow width of the lane creates a natural tunnel effect, perfect for framing your subject.
Best Angles for Hosier Lane
To capture the scale of Hosier Lane, stand near the Flinders Street entrance and shoot down the alley with a wide-angle lens (16-24mm). This will emphasize the towering walls of art. For a more abstract approach, get close to a single mural and focus on the brushstrokes or spray-paint details. The texture of the brick adds grit to your images.
- Use a polarizing filter to reduce glare from reflective surfaces like windows or wet pavement.
- Shoot during the "golden hour" (early morning or late afternoon) for warm, directional light that adds depth to the murals.
- Include people in your frame to show scale and add a human element to the scene.
3. AC/DC Lane: Rock and Roll Meets Street Art
Just a short walk from Hosier Lane, AC/DC Lane is a tribute to the legendary Australian band. This laneway has a darker, more rebellious vibe, with murals that often feature musical themes, portraits, and edgy abstract designs. The lane is narrower than Hosier, which creates an intimate and immersive experience. The lighting here can be tricky due to the overhanging structures, but that only adds to the moody atmosphere. This is one of the most atmospheric Melbourne Laneways Street Art Photo Spots for capturing dramatic, high-contrast images.
Camera Settings for Low Light
Because AC/DC Lane receives less direct sunlight, you will likely need to adjust your camera settings. Bump your ISO to 800-1600 to maintain a fast shutter speed (1/125s or faster) and avoid motion blur. Use a wide aperture (f/2.8 or f/4) if you want to isolate a specific mural against a blurred background. Tripods are allowed, but be mindful of foot traffic.
Pro Photography Tips: Look for reflections in puddles or wet surfaces after rain. The combination of neon lights from nearby bars and the wet ground can create stunning, mirror-like effects that double the visual impact of the street art.
4. Union Lane: A Burst of Color in the CBD
Union Lane, located off Bourke Street Mall, is a hidden gem that often gets overlooked by tourists. This laneway is a controlled painting site, meaning the murals are regularly refreshed by council-approved artists. The result is a constantly evolving gallery of bold, large-scale works. The lane is wider than most, allowing for more comfortable shooting angles. The vibe here is playful and vibrant, with murals that range from whimsical cartoon characters to intricate geometric patterns.
Framing Techniques for Wide Murals
To capture the full scale of Union Lane's larger murals, step back as far as the lane allows and use a 24-70mm zoom lens. Frame your shot to include the entire artwork, plus a small section of the surrounding environment for context. Alternatively, shoot at a slight diagonal to create dynamic tension in your composition. The even lighting in this lane (thanks to its north-south orientation) makes it suitable for shooting at almost any time of day.
- Experiment with symmetry by centering a mural and letting the lane's edges frame it naturally.
- Use a fast lens (f/1.8 or f/2) for creamy bokeh in the background if you are focusing on a specific detail.
- Shoot in raw format to retain maximum detail in the shadows and highlights.
5. Duckboard Place and The Blender Lane: Hidden Gems
Duckboard Place and The Blender Lane are two adjacent laneways near the Queen Victoria Market that offer a more curated street art experience. These lanes are part of the "Blender Studios" complex, where artists work in open studios, and the walls outside are covered in their creations. The vibe here is creative and collaborative, with a mix of traditional murals and experimental installations. The wooden duckboards on the ground add a rustic texture that contrasts beautifully with the colorful art.
Exploring the Details
These lanes are ideal for macro photography. Get close to the walls and capture the fine details: drips of paint, overlapping layers of paste-ups, and the subtle textures of the brick. The lighting here is partially covered by awnings, creating soft, diffused light that flatters any subject. Use a lens with image stabilization to handhold your camera at slower shutter speeds.
- Visit during weekdays when the lanes are less crowded for cleaner compositions.
- Look for hidden corners and alcoves where smaller, lesser-known artworks hide.
- Experiment with black and white conversion for a more timeless, gritty aesthetic.
6. Presgrave Place: Intimate and Atmospheric
Presgrave Place, tucked away between Little Collins Street and Bourke Street, is a narrow, covered laneway that feels like a secret passage. The low ceiling and dim lighting create a moody, almost cinematic atmosphere. The walls are covered in layers of tags and small murals, giving it a raw, underground vibe. This is one of the most authentic Melbourne Laneways Street Art Photo Spots for capturing the grittier side of the city's street art culture.
Shooting in Tight Spaces
Because Presgrave Place is so narrow, a wide-angle lens is essential. Shoot at 16mm or wider to capture the full height of the walls. Use a flash or an off-camera light to illuminate the darker sections, or embrace the shadows for a dramatic, noir-inspired look. The covered roof means you can shoot here even on rainy days without worrying about your gear.
For more location ideas, browse TripAdvisor's top street art attractions in Melbourne to plan your full photography walk.
7. How to Photograph Melbourne's Laneways Like a Pro
After exploring these ten incredible lanes, you will want to ensure your photos do justice to the art. Here are some essential tips for shooting street art in Melbourne's laneways. First, always respect the art and the artists. Do not touch the murals, and be mindful of other pedestrians. Second, experiment with different perspectives. Crouch down low, shoot from above if possible, or tilt your camera for a Dutch angle that adds energy to the frame. Third, pay attention to the background. Avoid including intrusive elements like trash bins, parked cars, or bright signs that distract from the art. Finally, edit your photos with a light touch. Enhance the colors and contrast, but keep the natural look of the murals intact.
8. When to Shoot: Best Lighting Conditions
Lighting is everything in photography, and Melbourne's laneways offer different moods depending on the time of day. Early morning (6:00 AM to 8:00 AM) provides soft, directional light with minimal foot traffic. Midday light can be harsh, but it creates dramatic shadows in the narrow alleys. Late afternoon (3:00 PM to 5:00 PM) bathes the walls in warm, golden tones. Overcast days are ideal for even, diffused lighting that makes colors pop without harsh highlights. For the best results, plan your walk to hit multiple lanes during the golden hours. Remember, the street art is constantly changing, so no two visits will ever be the same.
9. Essential Camera Gear and Settings
You do not need a professional camera to capture amazing photos of Melbourne Laneways Street Art Photo Spots, but the right gear can help. A wide-angle lens (16-35mm) is ideal for capturing the scale of large murals and the depth of the laneways. A prime lens (35mm or 50mm) is perfect for isolating details and achieving beautiful bokeh. A tripod is useful for low-light situations but be prepared to pack it away quickly in crowded areas. For camera settings, use a low ISO (100-400) for clean images, an aperture of f/5.6 to f/8 for maximum sharpness, and a shutter speed of at least 1/125s to freeze any motion. If you are using a smartphone, use the wide-angle mode and tap to expose on the brightest part of the scene.
Recommended Gear List
- Camera: Any DSLR, mirrorless, or high-end smartphone.
- Lens: 16-35mm f/2.8 or 24-70mm f/2.8.
- Polarizing filter to reduce glare and enhance colors.
- Portable tripod or GorillaPod for stability in low light.
- Extra batteries and memory cards (you will shoot a lot).
10. Final Tips for Respectful Street Art Photography
As you explore these incredible Melbourne Laneways Street Art Photo Spots, remember that street art is ephemeral. Murals get painted over, tags get buffed, and the landscape changes constantly. This impermanence is what makes each visit so special. Always credit the artists when sharing your photos on social media, and never remove or damage any artwork for the sake of a better shot. Engage with the local street art community by following artists on Instagram and attending gallery openings. The more you learn about the stories behind the murals, the deeper your appreciation will grow. Now grab your camera, put on comfortable shoes, and hit the lanes. Melbourne is waiting to inspire you.
Happy shooting from the team at Visualtravelspots.com.
Frequently Asked Questions
What are the best times to photograph street art in Melbourne's laneways?
Early mornings or late afternoons offer the best lighting and fewer crowds for photos.
Which laneway is most famous for street art in Melbourne?
Hosier Lane is the most iconic, featuring ever-changing murals and graffiti.
Are there any free walking tours for exploring laneway art?
Yes, some local guides offer free tours, but donations are appreciated.
Is drone photography allowed in the laneways?
No, drones are not permitted in Melbourne's city laneways without a permit.
What camera gear is recommended for photographing street art?
A wide-angle lens is ideal for capturing murals in tight spaces.
💬 Comments (0)
No comments yet. Be the first!